

4 Push ups to Target Upper Chest (That Actually Work)
All push ups recruit the chest (pectoral muscle) but there are a few things we need to know to specifically emphasise the upper chest (upper clavicular portion) and stop the lower chest (sternal portion and the shoulders (front deltoid) from dominating the exercise during push ups.
How do you target the upper chest with push ups?
To place the most tension on the upper chest with push ups you need to pull your shoulders back throughout the movement to give the upper chest the mechanical advantage to contribute most to the push.
Decline push ups shifts the emphasis of the tension from the lower chest to the upper chest
Placing your hands just wider the shoulder width maximises the contribution of the chest as opposed to the triceps and shoulders.
Deficit push ups help you get a deeper pectoral stretch for a more intense peak muscle contraction.
Lets look more at how to implement each push ups tips to optimally target the upper chest for stronger stronger, fuller pectoral muscle…
Pull your Shoulders Back: Optimal Shoulder Position for Push ups
A very common muscle imbalance is a larger and stronger lower pectoral, compared to a proportionally smaller and weaker upper chest.
A lot of people I have spoke to who have this problem assume its because they need to do more exercises that target and isolate the upper chest, so, for example, they will do incline bench press instead of flat bench press.
This may be true to an extent but the muscle imbalance is usually to do with where your shoulders are positioned during pushing exercises.
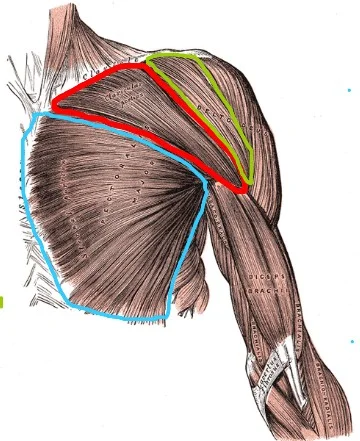
In red: Upper Clavicular Portion (upper chest)
Blue: Sternal Portion (lower chest)
Green: Front Deltoid
The real muscle imbalance is between your front deltoid and upper chest. This is because both muscles are so close together and share a lot of the same functions and if your not careful the front deltoid can dominate your upper chest.
The upper chest and the front deltoid are situated right next to each other and both muscles attached to the collar bone (clavical) and both attach to the humerus with the muscle fibres running in the same direction.
If you do your pushing exercises with rounded shoulders then the front deltoid will be doing most of the work that the upper chest should be doing and you end up with a comparatively over developed front deltoid compared to the underdeveloped upper chest.
Here’s what you need to do: To address this imbalance and get the upper chest firing again you need to pull your shoulders back and down before doing your push ups and make sure that your shoulder blades are pulled back throughout the duration of the exercise. (The same is true for the bench press).
With the shoulders drawn back and the chest pushed out, you put your upper chest at a mechanical advantage over the deltoid to do the actual pushing.
Immediately as you do this you feel your upper chest doing more work as the tension is now directed specifically to the upper clavicular portion and not the deltoid.
The number of push ups you can do will take a dive as you focus the intensity on a relatively under developed upper chest, but this is a good thing as it gives us the opportunity to make significant gains in upper chest strength and size and readdress the muscle imbalance.
This will also contribute to much better posture as the exercise encourages correct shoulder positioning and changes your movement patterns.
How to implement: Try to complete 8-12 reps for 3-5 sets of push ups with your shoulder pulled back and down and consciously push your upper chest out. Keep those shoulder back throughout the duration exercise.
You will immediately feel how this is much more difficult then regular push ups and likely feel significant doms (delayed onset muscle soreness as the tension is now directed to your upper chest and your shoulders contribute much less to the exercise from a pushing stand point.
Once you become comfortable with this exercise, progress to decline push ups to increase the intensity of the exercise…
Decline push ups to Target the Upper Chest
With pushing exercises, the angle you use determines which part of the chest is under most tension.

Incline push ups emphasise the lower chest, conventional push ups emphasise the sternal portion of the chest and decline push ups hit the upper chest.
Decline push ups are the most effective variation of push up to target the upper chest.
The two reasons for this are:
A decline angle of push up shifts the emphasis of the tension from the exercise from the lower chest (sternal portion) to the upper chest (upper clavicular portion).
Because your feet are elevated there is a greater proportion of your bodyweight supported by your upper body which increases the workload for the chest (and triceps). By changing the angle you can control the tension.
A conventional push up (or flat bench press) recruits the whole pectoral muscle, but there is less emphasis on the upper chest at this angle and the sternal portion contributes more to the exercise.
As you increase the angle of decline by elevating your feet (on a bench) the upper chest is forced to take on a greater workload.
In fact the intensity of the exercise increases as the angle of decline increases, but only up until your body is angled towards the floor at 45 degrees.
As soon as you exceed 45 degrees, the emphasis of the exercise shifts from the upper chest to the shoulders, so it becomes more of a shoulder exercise, similar to an over head press with a barbell.
The same is true on a bench press. The normal flat bench press recruits the whole pectoral but the sternal portion of the muscle is under the most tension. As you change the incline of the bench press the majority of the tension shifts from the sternal portion (lower chest) to the upper clavicular portion (upper chest).
After 45 degrees of incline bench press the exercise -much like the decline push up- becomes more of a shoulder dominant exercise and there is subsequently less tension on the upper chest.
How to implement: For optimal results you should make sure your shoulder positioning is correct as described in the first step with your shoulder blades pulled in together to give the upper chest the mechanical advantage to do the most work.
The great thing about decline push ups is that you can adjust the difficulty to suit your ability, therefore there is a lot of potential for progressive overload and muscle hypertrophy.
Start by elevating your feet by a few inches with whatever is available around you (bench, chair, stack of weights etc.) and perform 8-12 reps for 3-5 sets. This will take a bit of trial and error to find the appropriate angle for your ability so don’t worry too much about reps and sets when you are starting off.
As soon as you become comfortable performing a set amount of reps, with your feet at a certain height, you need to increase the intensity by increasing the angle of decline, so find a higher bench.
The higher you go the exercise quickly becomes significantly more difficult as the lower chest participates less and the upper chest in under much more stress to cope with the higher workload.
Also with a regular push up, you are pushing approximately 70% of your bodyweight, with a decline push up you can be pushing as much as 90% when your at a 45 degree angle hence why the exercise is so much more difficult.
With decline push ups it is very easy to maintain a progressive overload by increasing the intensity of the exercise by elevating your feet and increasing the angle of decline as you get stronger so you can continue to make strength and muscle gains.
Pro tip: You can incorporate some stability training by elevating you feet using a swiss ball (or bosu ball). The added instability of the ball increases the demand on your stabiliser muscles, particularly in the core and the rotator cuff. (Check out my full guide on rotator cuff stability for bullet proof shoulders).
This will increase your body’s capacity for stability (good for injury prevention) and increase the demand on all the muscles groups involved (including the upper chest) in the exercise as they all contribute to maintaining a stable base throughout the movement.
Wide Grip Push ups for Upper Chest
The two primary movers of the push ups are the triceps and chest. In order to put as much focus on the chest as possible you need to be mindful of how far apart you are placing you hands.
Generally speaking the closer your hands are together the more emphasis there is on your triceps. (Check out my tips on how to get bigger triceps with diamond push ups)
Diamond push ups for example are a superb exercise to grow your triceps. But to focus the tension onto the upper chest wee need to adopt a wider hand placement.
Adopting a wider hand placement puts your chest at a mechanical advantage to contribute to the exercise far more then the triceps.
However this does not mean you should adopt as wide a hand placement as possible.
The optimal distance for you hands is just slightly wider then shoulder width.
There are two reasons for this:
If your hands are too far apart then your range of motion becomes too shallow and you will not get a enough deep muscle activation in the chest.
If you hands are too far apart then you can risk unnecessarily stressing the shoulder joint.
Shoulder width push ups are the ideal placement between targeting the chest and not risking shoulder injury from poor positioning.
If you hands are out too wide, then often the elbows tend to flare out away from the body, usually as an attempt to maintain stability which just puts unnecessary pressure on you shoulder joint that could lead to injury.
You need to make sure you keep your elbows within a 45 degrees or less from your body. If your elbows are out any wider then you are just covering for poor form or a lack of stability strength.
Remember we have to prioritise the quality of the rep rather then the quantity when in the context of muscle growth (and injury prevention).
How to implement: If you incorporate a shoulder width push up position with your shoulder blades squeezed together (as described in the first step) then you can put a huge amount of stress specifically on the upper chest to stimulate a muscle building response for stronger and fuller upper chest development.
When you can comfortably execute these push ups for 8-12 reps for 3-5 sets then you need to maintain a progressive overload by elevating your feet with decline push ups to continue to add stress to the muscle and therefore you give your upper chest no choice but to adaptively respond by increasing in size and strength.
The optimal time under tension: As I have stated, if your building muscle then the quality of each rep is more important then a specific quantity.
So you should not compromise your form by
Performing your reps too quickly
Only performing reps with a partial range of motion
Skipping the eccentric or ‘negative’ phase of the movement.
Don’t leave gains on the table and shortchange your results by cheating your workout for the sake of achieving a specific number of reps.
For muscle growth the latest research shows that the optimal time under tension is 45-75 seconds per set.
So to put this into context, for a set of 12 push ups your should spend approximately 1.75 seconds push up (concentric phase) 1.75 seconds lowering down (eccentric phase) and 1 seconds isometric hold at the bottom of the movement.
This ensures that your muscle has been under stress for enough time to effectively elicit a muscle building response (hypertrophy).
Its also worth noting that the research shows the eccentric phase is essential for muscle growth, so don’t passively drop down after every rep but resist the movement so that you spend as much time in the concentric phase of the movement as you do the eccentric phase.
Deficit Push ups: Greater Range of Motion
The forth step is not necessarily specific to upper chest development, but if you implement the first three steps then you can add this step for some added intensity to progressively gain strength and muscle.
The benefits of deep push ups is that they increase your range of motion. With conventional push ups you are restricted by your chest meeting the floor, but if you elevate your hands with push up bars (or something similar) then you can get a much deeper stretch on the pectoral for a deeper muscle contraction and a greater number of muscle fibres recruited.
This is similar to bench pressing with a barbell, (which will inevitably make contact with your chest) to bench pressing with dumbbells which are capable of a greater range of motion and more muscle activation.
You don’t need to raise your hands by much to reap these benefits. Just a pair of push up bars (or kettle bells) that you can buy on amazon will be perfect for this.
Because your hands only need to be raised a few inches, you can easily implement this step with decline push ups, so the two steps are fully compatible.
I cannot emphasises enough how effective this exercise is for really getting a deep stretch for the chest and really test the pectoral through its full range of motion.
The upper chest in particular is a much smaller portion of the muscle therefore if you have the combined stimulus of:
Decline push ups
With your shoulders pulled back
Hands spaced slightly wider then shoulder width apart
Whilst using push up bars
Then there is huge potential for tension on the upper chest and massive opportunity for strength and muscle gain for a fuller, stronger chest.
Pro tip: Sore Wrists? If your wrists are sore from push ups on the ground, then using push up bars, TRX or gymnastic ring push ups are significantly easier on your wrist joint as the wrist is in a neutral position as opposed to the hand being extended back which can lead to discomfort and injury.
Using a set of push up bars keeps your wrist in a much more comfortable position with compromising your joints.
Read my article for more info on How to Avoid Wrist Pain from Push ups
If you have any questions or need any push up advice please leave a comment below and I will help you out and if you found this article helpful I’d appreciate a share on social media! ↓ ↓ ↓

