

How to do Ring Dips: Beginner Guide (5 progressions)
Ring dips for beginners, full tutorial:
So before you start you want to make sure that your ring set up is optimised for dips. There are several important factors to take into consideration:
The width of the ring straps: You want to space your rings so that they hang shoulder width apart. They need to so your hands, elbows and shoulders are perfectly inline when you adopt a support hold at the top of the movement. If your rings are spaced too wide then this will aggravate the elbow joint and make the exercise more difficult, not in terms of resistance but in terms of pulling awkwardly and unnecessarily at your joints. If your hanging your rings over a bar then adjusting the space between them is easy to do, however if you rings are secured to fixed anchor points you may need to adjust the fittings so that your rings are spaced correctly.
The height of your rings: The height of the rings is particularly important if you are a beginner. You want to have the rings at a height where you don't have to jump or drop into a support hold but step into the movement comfortably. Change the rings so that are at the right height for you rather then trying to reach rings that are either too high or too low. This makes a real difference when you are a beginner as the support hold at the start of the dip is difficult due to the unstable, free moving nature of the rings.
The Best Gymnastic Rings
To perform ring dips you need the right tools for the job. Some cheap gymnastic rings have straps that are far too short and therefore you cannot hang them from a high anchor point (such as garage beams) and adjust the rings to the optimal height. Also the cheaper rings are often made with plywood which has a tendency to split whilst your using them (very dangerous!). Check out my guide on the best gymnastic rings available on amazon which have appropriately longer straps, robust buckles and made from solid birch wood so that they last a lifetime. They’re worth the investment.
Progression #1 The support hold
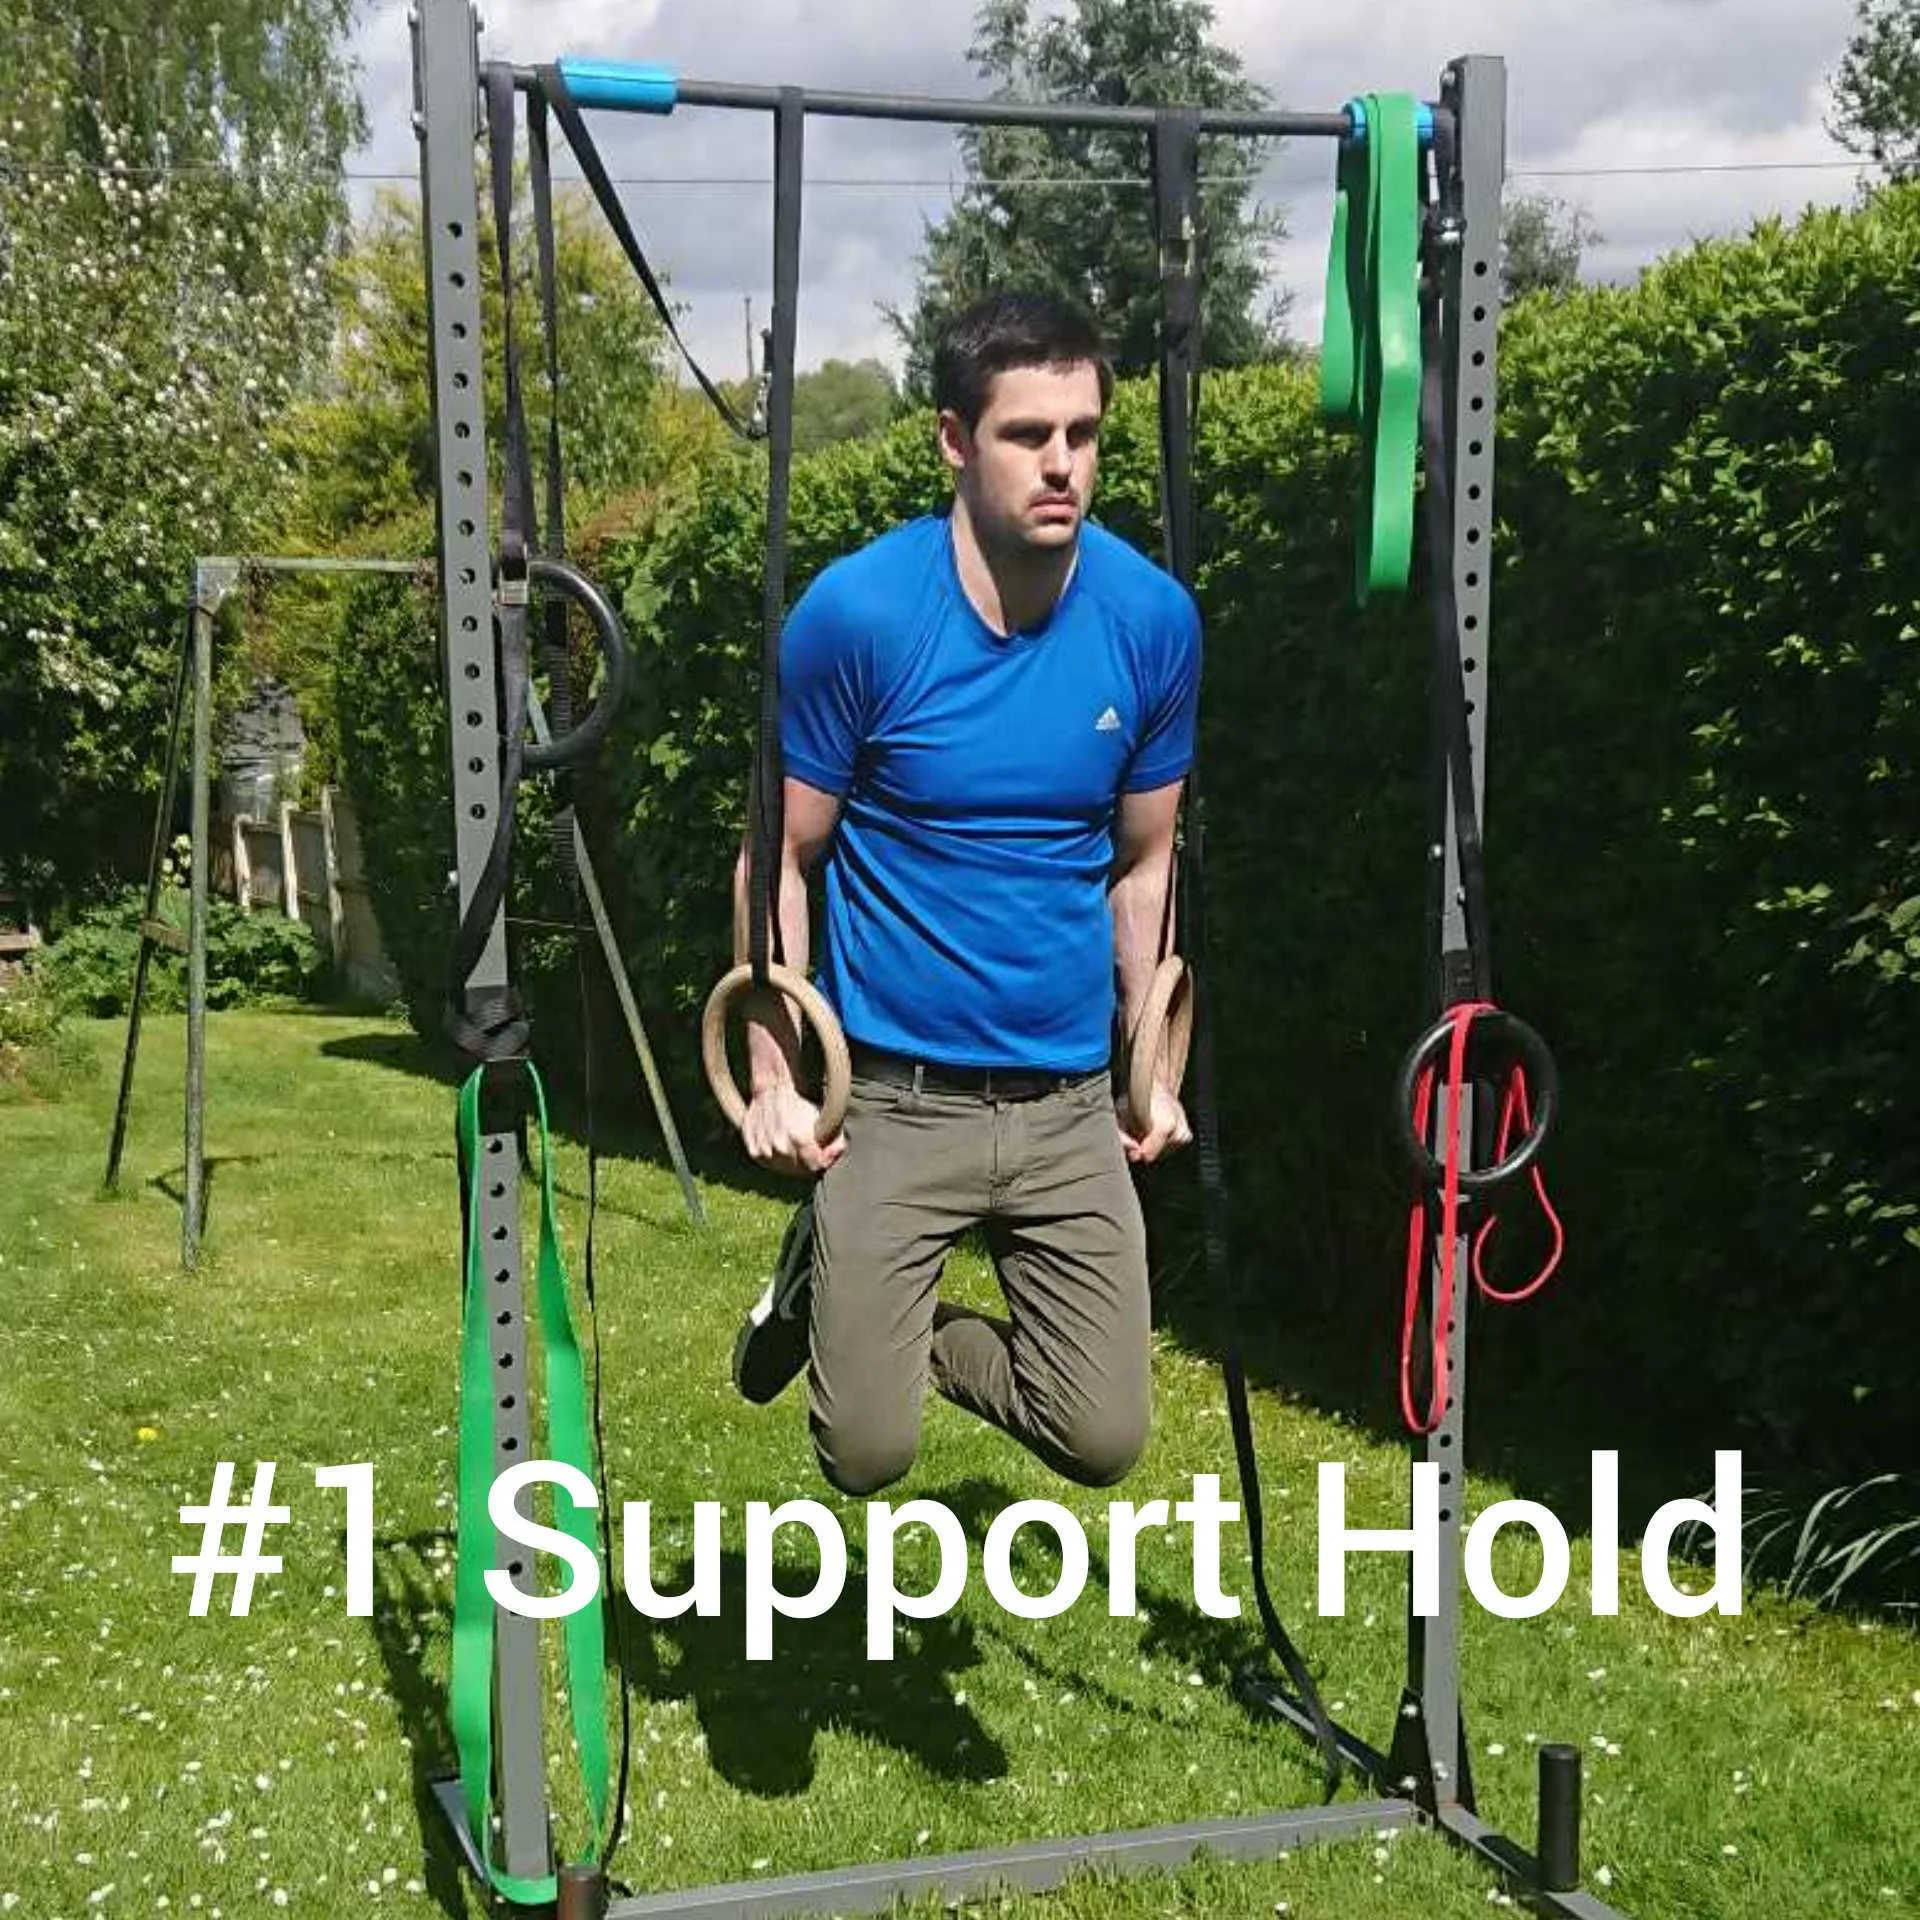
The support hold is the fundamental starting point for all ring training. Its a move that is made surprisingly difficult by the instability of the rings, which makes this a far harder technique then a support hold on dipping bars.
Lower the rings so that you can hold on to them in a dipping position, so that your feet are still on the ground. Draw your shoulders back and lock out the arms at the elbow, so that they are completely straight. Start to take the weight on your arms and decrease the assistance from the legs. If you can, start to take your feet off the ground by bending at the knee.
If you are not used to ring training, the first time you attempt a support hold, your arms and body begin to shake with a lack of control. This is because your shoulders are unaccustomed to supporting your body weight whilst controlling and coordinating your balance.
At first the instability seems overwhelming. If you can maintain a hold, in support for a few seconds then that's a great starting point. If you can't hold it for more then a second don't be disheartened. All it takes is some perseverance and you can progress surprisingly quickly.
The muscles that make up the rotator cuff (Supraspinatus,Infraspinatus,Teres minor, and Subscapularis) are primarily the muscles that are responsible for shoulder stability.
Traditional lifting exercises that target the rotator cuff, such as the lateral raise do not address the muscle's capacity for stability and are more centred around body building as opposed to functional movement.
This is why someone who is a competent lifter in the gym is likely to struggle as much as a beginner on gymnastic rings.
The best ways build the strength to hold this position is to:
If you are already capable of holding a top position try to do so for as long as possible. It will take less time then you think to get accustomed to this position. Even if you are only holding for a few seconds this is the best way to build the stability in the shoulder. After every workout your rotator cuff will adapt to supporting you in this position and keeping your body still. Quality is more important then quantity here so don't worry too much about the specifics of reps and sets.
Just try to remain in hold for as long as possible and try to do this for approximately 10 reps. Take a rest between each rep. We are trying to build strength here so don't subscribe to the usual muscle building formula of 8-12 reps for 3 sets as it wont serve you best. Also stop a few reps before you completely fatigue as you don't want to compromise on technique. Do this 2 times per week and you should progress very quickly.

If you cannot maintain a support position with your elbows locked out for very long time then don't worry. Band assisted support is perfectly fine at this stage. If you cannot hold yourself up for more then a second or so then this will help support you during the exercise so that you can get used to the feeling of the position for a meaningful amount of time.
Loop the band around your hands and then under your knees. This will help to stabilise the rings enough for you to maintain a hold but provide enough of a stimulus for your shoulder muscles to get stronger in this position.
The great thing about bands is that you can get a range that are of different thickness and therefore a stronger tension. For that reason they lend themselves especially well to progressional work. Start with a thick band the offers a lot of support. If you find that too easy then go down through the grades till you find the right band that supports you sufficiently but provides enough of a test as your shoulder and chest adapts and gets stronger.
Progression #2 Ring push ups
Now you have the strength to stay in a support hold it is time to develop the strength for the dips and simulate their range of motion. The best way to prepare for this is to become proficient at ring push ups. Ring push ups work all the same muscles as ring dips but have the added benefit of having your feet on the ground.
The point of contact on the ground partially reduces instability, however it is still a challenge for the stabilising rotator cuffs. This will help in particular to develop the coordination required to keep your body stable as you do go through the motion pattern.
Start by lowering the rings so that they are about 2 ft off the ground and at shoulder width apart. Perform a push up as you would on the ground and aim for 6 - 10 reps for 3 sets.
Ring push ups are significantly harder then standard push ups, just as ring dips are more difficult then bar dips so don't be disheartened if you perform less reps on the rings then you would doing a regular push up. This is totally normal.
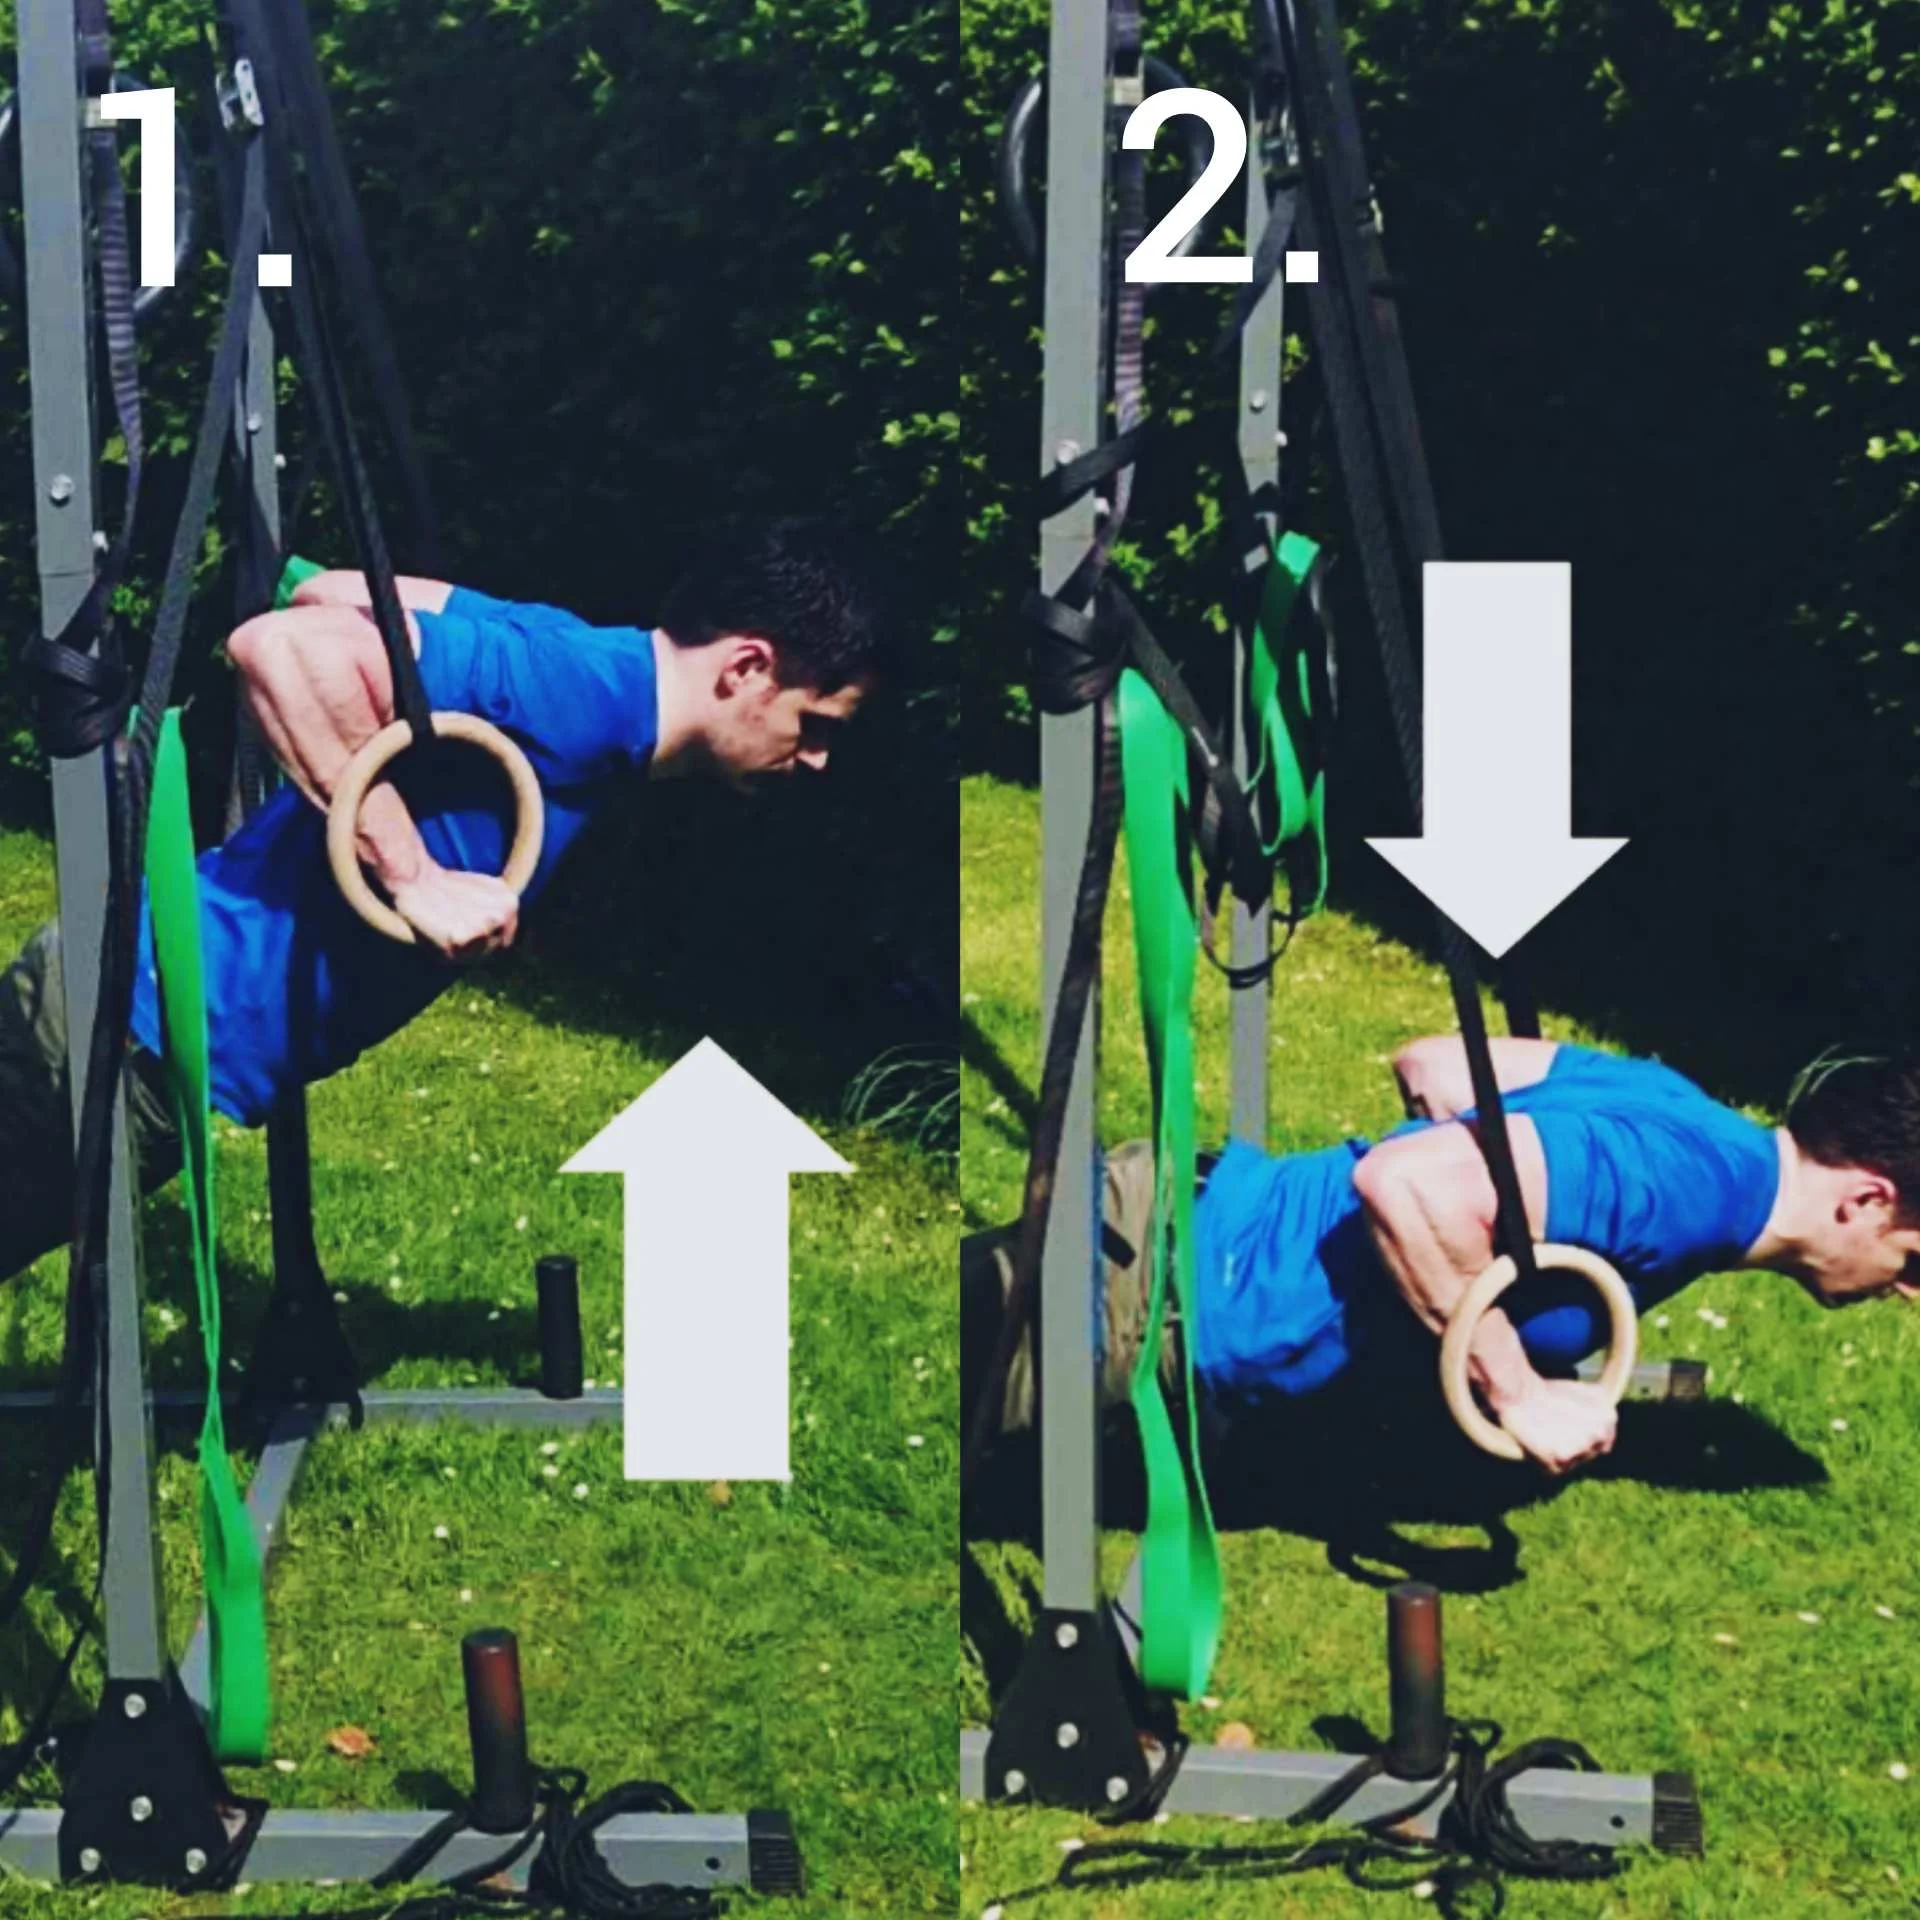
If you cannot achieve 6-10 reps then all you have to do is raise the height of the rings in increments of 6 inches and try again until you find a height where you feel comfortable and can perform more then 6 reps with good form. The higher the rings hang the easier the exercise is.
In photo number one, the rings are set so that I can perform the push ups at a 45 degree angle. At this height the exercise is not as challenging. However it is a good starting point to assess your strength and to become comfortable with the exercise before lowering the height of the rings and increasing the difficulty.
In photo number two the rings are set much lower to the ground and the intensity is much greater. The lower the angle, the less weight is being supported by the feet and the exercise becomes much more difficult. This gives you a very realistic sense of what a full weight dip feels like, in terms of balance, coordination and resistance.
Train this progression about twice per week. If you get the doms (delayed onset muscles soreness) then lower the training frequency to once per week to avoid over training your chest and shoulders.
The ring push up is an incredible effective tool to train for a dip, as it uses the exact same muscle groups and mimics the instability and the rotation of the rings that you will feel when performing dips, without having to support your entire body weight.
This movement conditions your shoulder, chest and core perfectly to progress to a full dip. Once you can hit 6 solid reps then this will stand you in very good sted to achieve the unassisted ring dip.
Progression #3: Declines or eccentric dips
A decline or eccentric refers to the lowering phase of any movement. In this case of the dip, it is lowering from support hold at the top of the dip, all the way down to the bottom with the rings touching the chest and then stand up, for one rep.
Whilst the ring push ups develop the strength, balance and coordination to perform dips, the eccentric dip will help to develop the specific technique of the dip as well as the strength.
With a ring push up you are supporting 60-70% of your body weight, depending at what height the rings are. With the eccentric movement you will be supporting 100% of your body weight on the rings.
Eccentrics is my favourite way to develop the strength as a progression to do any exercise in calisthenics. This is the same progression I use when trained for muscle ups, pull ups and handstand push ups.
Start at the top of the movement in a support hold and lower yourself down through a dip range of motion to the bottom. Aim to keep you feet off the floor but make sure your feet can touch the ground throughout the exercise in case you need additional support.
Once you are at the bottom of the range of motion, lower your feet and stand up to do the exercise again. Make sure you do the movement as slow and as controlled as possible. A good benchmark is If you can lower yourself down and keep under tension whilst slowly counting to three; this pace will provide the right stimulus to gain strength.
As this is a strength and technique progression, aim to keep the reps low at about 6 reps for 3 sets. However you do not have to follow the reps and sets recommendation too strictly for this exercise. We are focusing a quality movement with time under tension in order to develop the strength to support and move with your entire body weight.
If you try to do too many reps when you are not yet strong enough, you will just fatigue and not concentrate on the form or pace of the exercise.
Keep up the eccentric progressions for however long it take for you to feel comfortable doing the exercise and train them twice a week and you will advance very quickly.
Once you have become proficient with this exercise and feel strong throughout the range of movement, you may be able to skip the final progression and attempt your first unassisted ring dip. If the ring dip is not yet achievable or you can only do a partial reps then fear not and continue with progression number 4.
Progression #4: Banded dips
So with the eccentric dips we have gained the strength to coordinate and balance the body for the lowering phase of the movement. Now we need to make sure we have the strength to push up.
The best way to train this is with a little assistance in the form of a resistance band. The band helps you complete the exercise with full range of motion withput having to lift your entire weight.
If you can already perform an eccentric dip then your strength will be good and you will probably need the band with the least amount of resistance.
Hold either end of the band and a ring in each hand and loop the band under your knees.
Lower yourself down as slowly as possible. The lower you go with this exercise the more the band will assist you. The maximum amount of assistance is at the bottom of the exercise when your chest is lowered so it should be achievable at this point to push yourself back up to a support hold and complete and entire dip with full range of motion.
Do this for 6-10 reps for 3 sets twice a week. Anymore and you will be over training your chest and shoulders which will lead to a decline in form and technique as well as the number of quality reps you can complete.
If this exercise is too difficult and you cant push yourself back up or you can't hit the right rep range then use a thicker band to add more assistance.
If you can do this exercise competently with the lightest resistance band for a good number of reps then I have no doubt you have built up the strength to achieve your first unassisted rings dip.
Progression #5: Unassisted full range of motion ring dip
If you have followed the progressive steps in order then you will have developed the strength, balance and confidence to do you first full reps. The ring muscle up is incredibly rewarding exercise to do and offers many benefits over the bar dips, including
Increased shoulder stability
Stronger core, chest and shoulders
A compound exercise that recruits more muscle fibers for greater gains in strength and muscle mass.
For the full ring dip start in a support hold with your elbows locked out and your arms straight. Lower yourself down so that your triceps are at roughly a 90 degree angle/parallel with the floor. For the bottom of the movement push yourself back up to the top and back into support hold ready for the next rep.
If you mange your first unassisted rep of a ring dip then you have you should be very proud of your accomplishment. People who can do as many as 20 dips on a dip station/parallel bars often can't do a single ring dip as the shoulder stability and strength hasn't been developed.
Even though the rings and bar variations of the dip look very similar, The strength gained from doing bar dips doesn't necessarily cross over to rings and rings dip on can feel like an entirely different exercise.
If you can work up to 6 reps per set of full ring dips then you will be a venerable practitioner of ring exercises and you should be very proud.
For bonus credit try to externally rotate the rings when in support hold between each rep. This will further strengthen your rotator cuff and make your shoulders practically injury proof.
Progressions from this exercise include the ring muscle up and weighted ring dips.
I hope you enjoyed the article, if you found it helpful please share on social media using the buttons below and if you need any further help or clarification please leave a comment.

