

5 Progressions to Master the False Grip for the Muscle up
What is the false grip and how does it differ from a regular grip?
The false grip is originally a grip used in gymnastics for the rings. The hand position on the rings allows for the smooth transition of the gymnast to move his or her body from below the rings to above the rings in a support hold without the need for momentum.
Before the explosion in popularity of CrossFit and calisthenics the false grip was almost exclusively the preserve of the gymnast.
But now gymnastics techniques have made their way into the repertoire of more training styles, and the grip has not become an integral part in certain exercises of both CrossFit and calisthenics.
The false grip differs from a regular, conventional grip in that the wrist lies over the rings or bar whereas for a standard grip for pull ups the wrist is below the bar and hangs from a neutral grip.
For the optimal grip, the diameter of the ring is important. I found from years of testing that a thickness of 1.5 inches is ideal for the most comfortable false grip. Take a look at my gymnastic rings recommendations from amazon to see which rings I use and recommend to others.
What exercises require a False grip?
The technique that the false grip is most commonly used for is the muscle up on gymnastic rings. A technique that consists of a pull up, a transition phase and dip, before the eccentric decline back to the start position. You can see my full gymnastics ring muscle up tutorial here.
It is also used for advanced techniques when learning the front and back levers or any time a gymnast wants to transition from below the rings to a support hold above the rings, so a proficient false grip is useful to have in your calisthenics arsenal.
Prerequisites: Use chalk to improve your grip
Before you attempt the false grip progressions I would advise that you should apply liquid or block chalk to your hands in order to improve your grip and minimise the chance of sweat or anything else hindering your chances of holding a solid grip.
One of the most common problems with false grip training is your hands slipping out of the ideal position when holding your full weight because of a compromised grip due to either the rings or your hand being too slick.
When applying the chalk particularly concentrate on the areas of the hand and wrist that will be in contact with the ring and bearing the most weight.
Both liquid chalk and traditional block chalk are suitable, however I have a strong preference for liquid chalk. It far easier to apply and doesn't generate the characteristic chalk dust that gets all over your clothes and occasionally end up accidentally inhaling.
Progression #1 : false grip technique
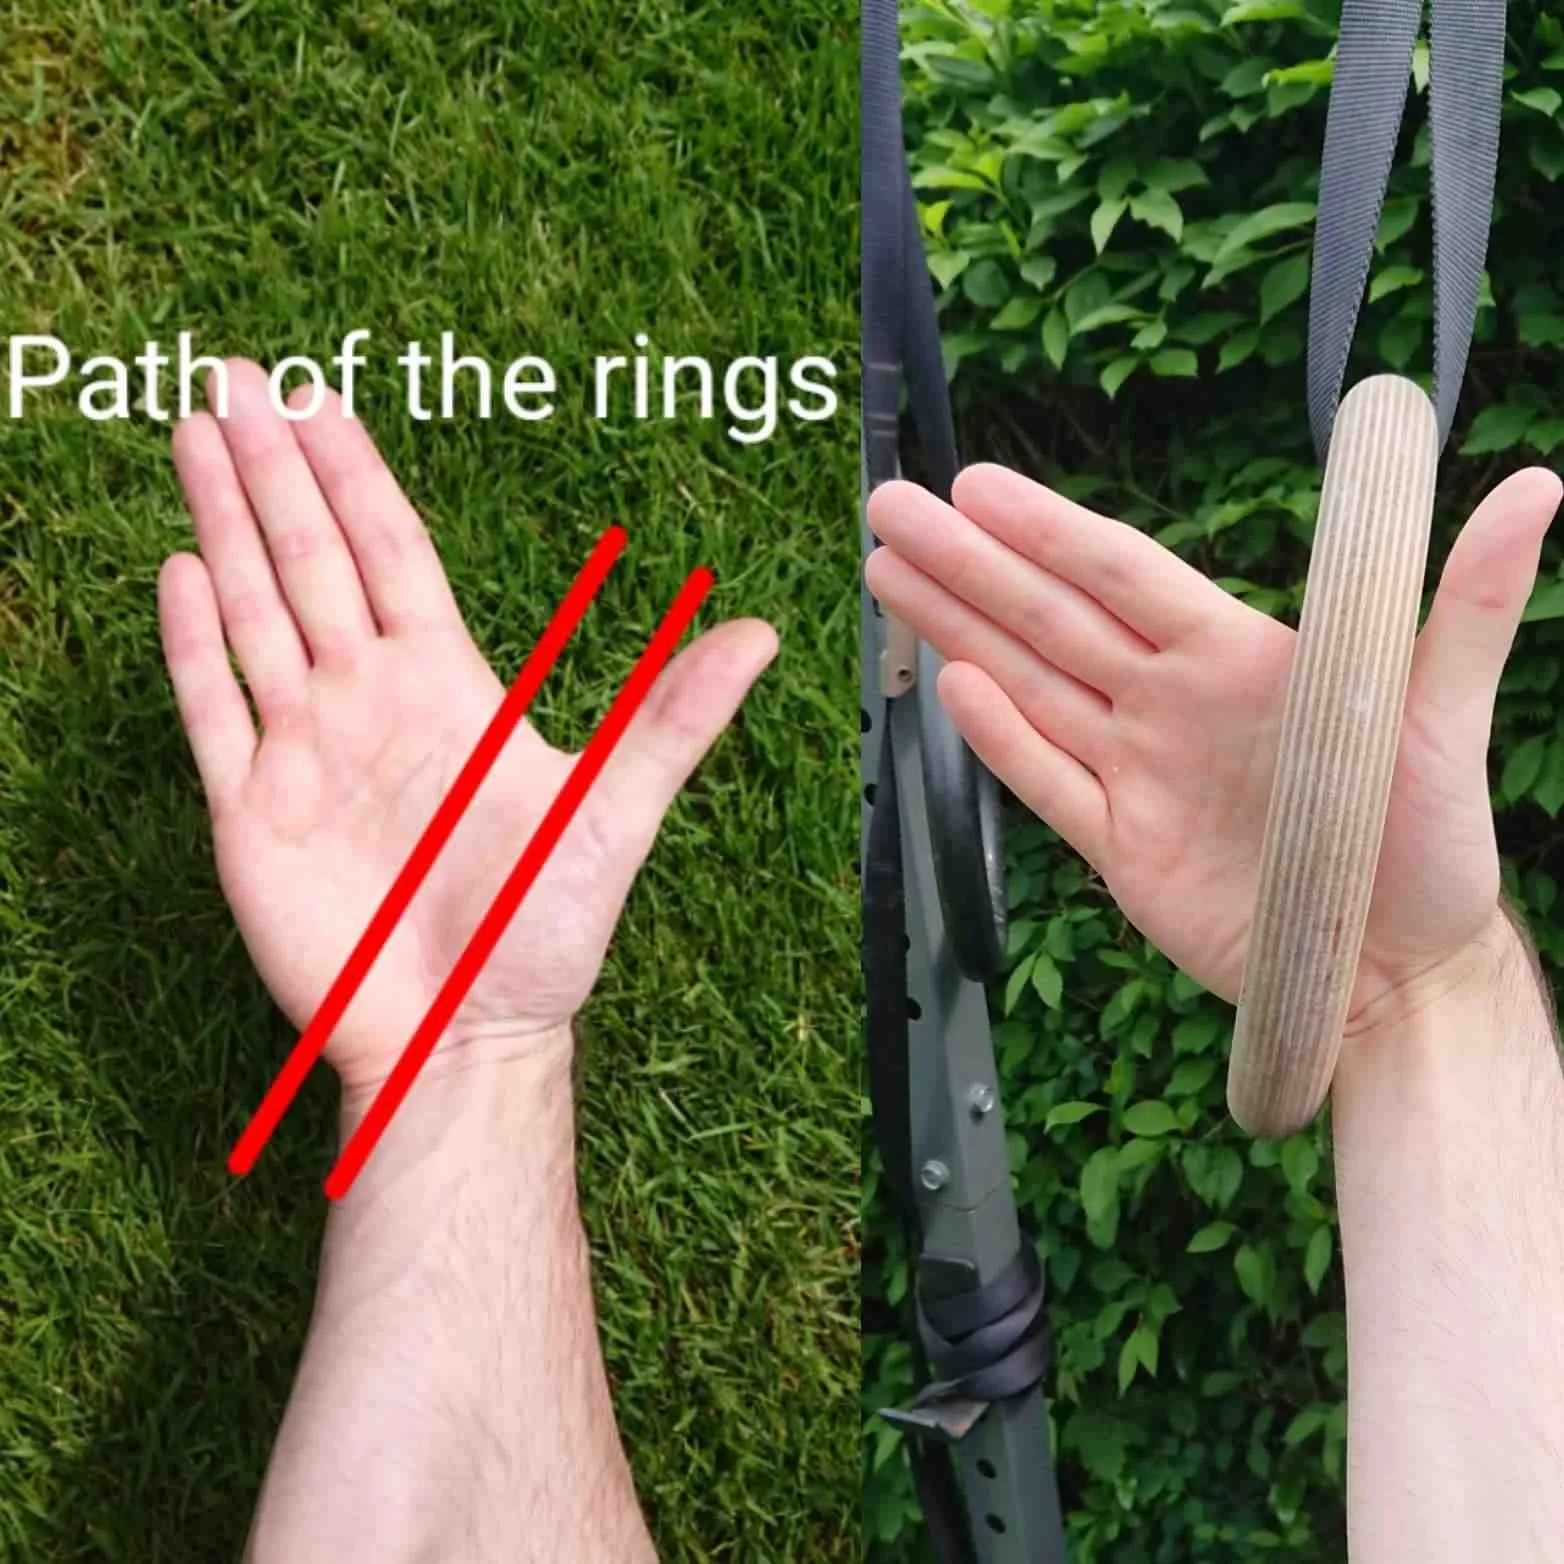
The first thing we need to learn is exactly where the rings sits on the hand and wrist when adopting a false grip.
The ring sits at a diagonal angle across the palm and wrist. When you have your palms facing towards you, the little knobbly bone at the bottom of your hand and just above your wrist (pisiform bone) should sit on top of the ring as in the photo.
When you close your hand and grab the rings your wrist should rest slightly on top of the rings which allows you to transition during a muscle up without having to shift the position of your hands, mid movement for a smooth technique.
This way of holding the rings will feel unusual at first but with patience and repeat exposure and following the progressions this hand position will become second nature.
Progression #2: False grip rows
The second progression is to adopt the false grip as shown and lean back into a body weight row position with your feet out in front of you. This will get you used to the feel of the false grip without adding too much body weight to the mix.
If you try to hang with all your body weight without putting in the ground work, the resistance will be overwhelming and your hand position is inevitably going to slip out of place. It more important at this point to get used to the technique of the false grip and how it feels.
With the body weight row you are in control so you can add or take away however much body weight you want by the angle of your lean. The lower the angle of your body, more resistance you are adding.
This makes the row a great scalable progression because you can add a greater proportion of body weight to the exercise as you get more and more comfortable with the false grip.
This also conditions your wrist mobility safely if you are having problems with forearm flexibility.
Once you have become accustomed to false grip rows and you can perform more then 12 reps at a deep angle it is time to advance to progression number three.
Progression #3 false grip isometrics
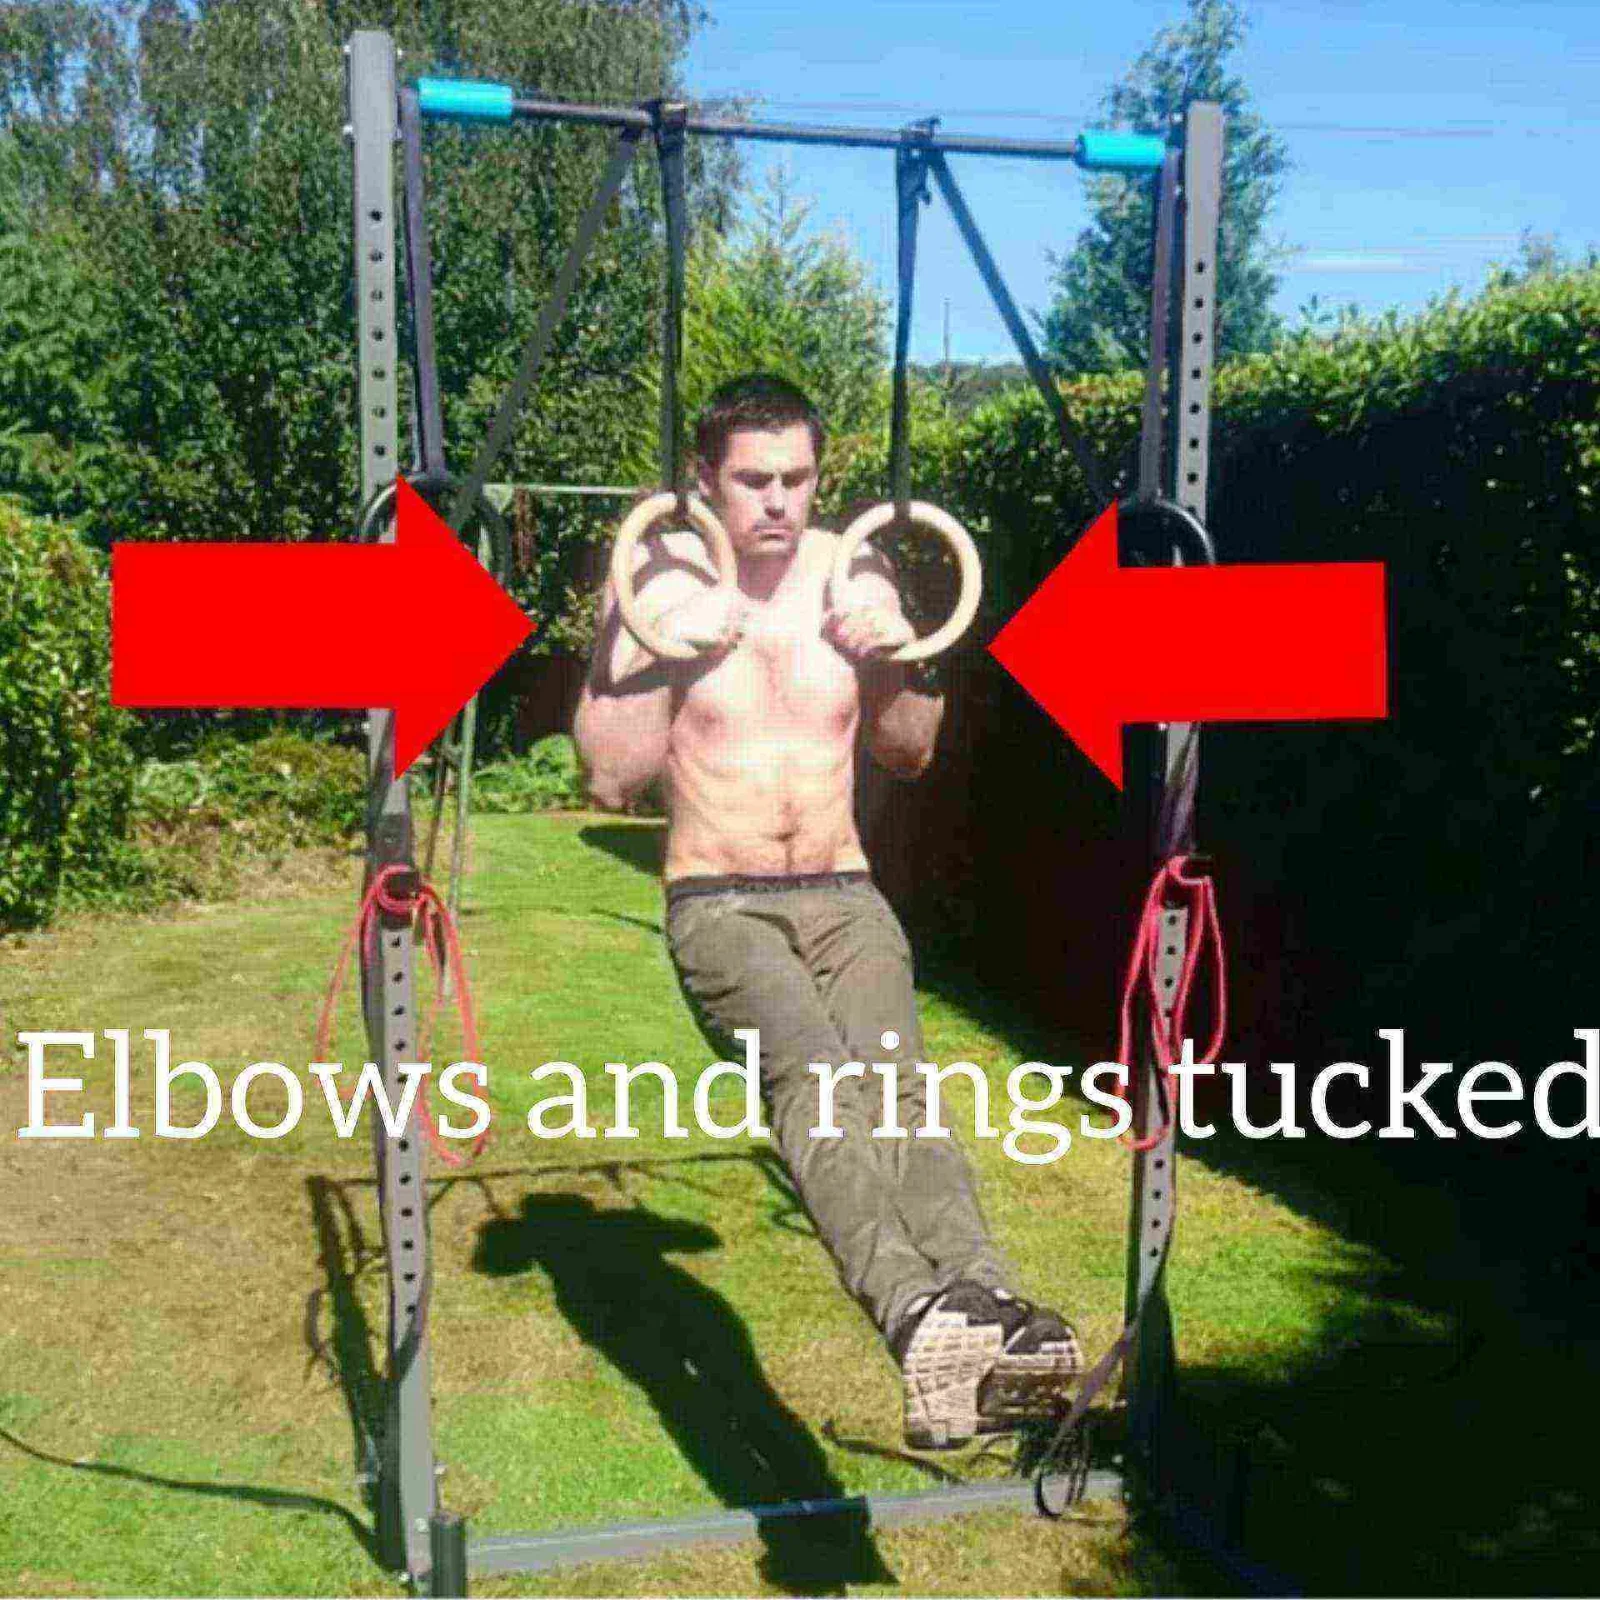
The best way to condition your false grip for the muscle up is to try and get used to the different positions through the pulling phase of the motion. The easiest position to start with is the top hold as shown in the photo. This is the moment just before you enter the transition phase of a muscle up.
Make sure to draw your rings in close to your chest and keep your elbows tucked close to your side.
Keeping your elbows and hands in tight helps stabilise your body and it is the correct placement for to enter the transition for the muscle up.
To see how to complete the ring muscle up transition successfully have a look at my blog tutorial here.
On first impressions you may not think that the top position of the pull up is the easiest position to hold. Its true that, holding yourself up in an isometric position at the top of the movement is more difficult then hanging more passively below with a normal grip.
However with the false grip this position is slightly easier because of the angle of the forearm is slightly raised and not at 90 degrees as it would be if you were hanging directly below the rings.
Therefore the top position requires less wrist flexion and mobility then it would be if you were at the bottom of a pull up with your arms out straight.
When training your false grip capacity, hold this position for as long as you can and do this about 5 times with plenty of rest and recovery between reps.
This is a difficult position to hold at first so using some assistance can help you become more familiar with the position without fatiguing to quickly. You can either:
Use a resistance band or...
Assist with your feet on the ground
Planting your feet on the ground so that your legs support some of your weight, is great way to get accustomed to the false grip at the top of the pull up without having to hold your full weight.
As you get stronger in this position focus on decreasing the amount of assistance from the legs. This will allow you to familiarise yourself with the false grip whilst under a reduced amount of tension.
The second way is to take either end of a resistance band in each hand and loop it under your butt. Hold the resistance band between your index finger and thumb and hold the rings in the false grip as normal
The resistance band is going to support your body weight throughout the movement to help your body to get accustomed to holding top of the pull up without having to carry your whole body weight.
Progression #4 False grip isometrics (pull up)

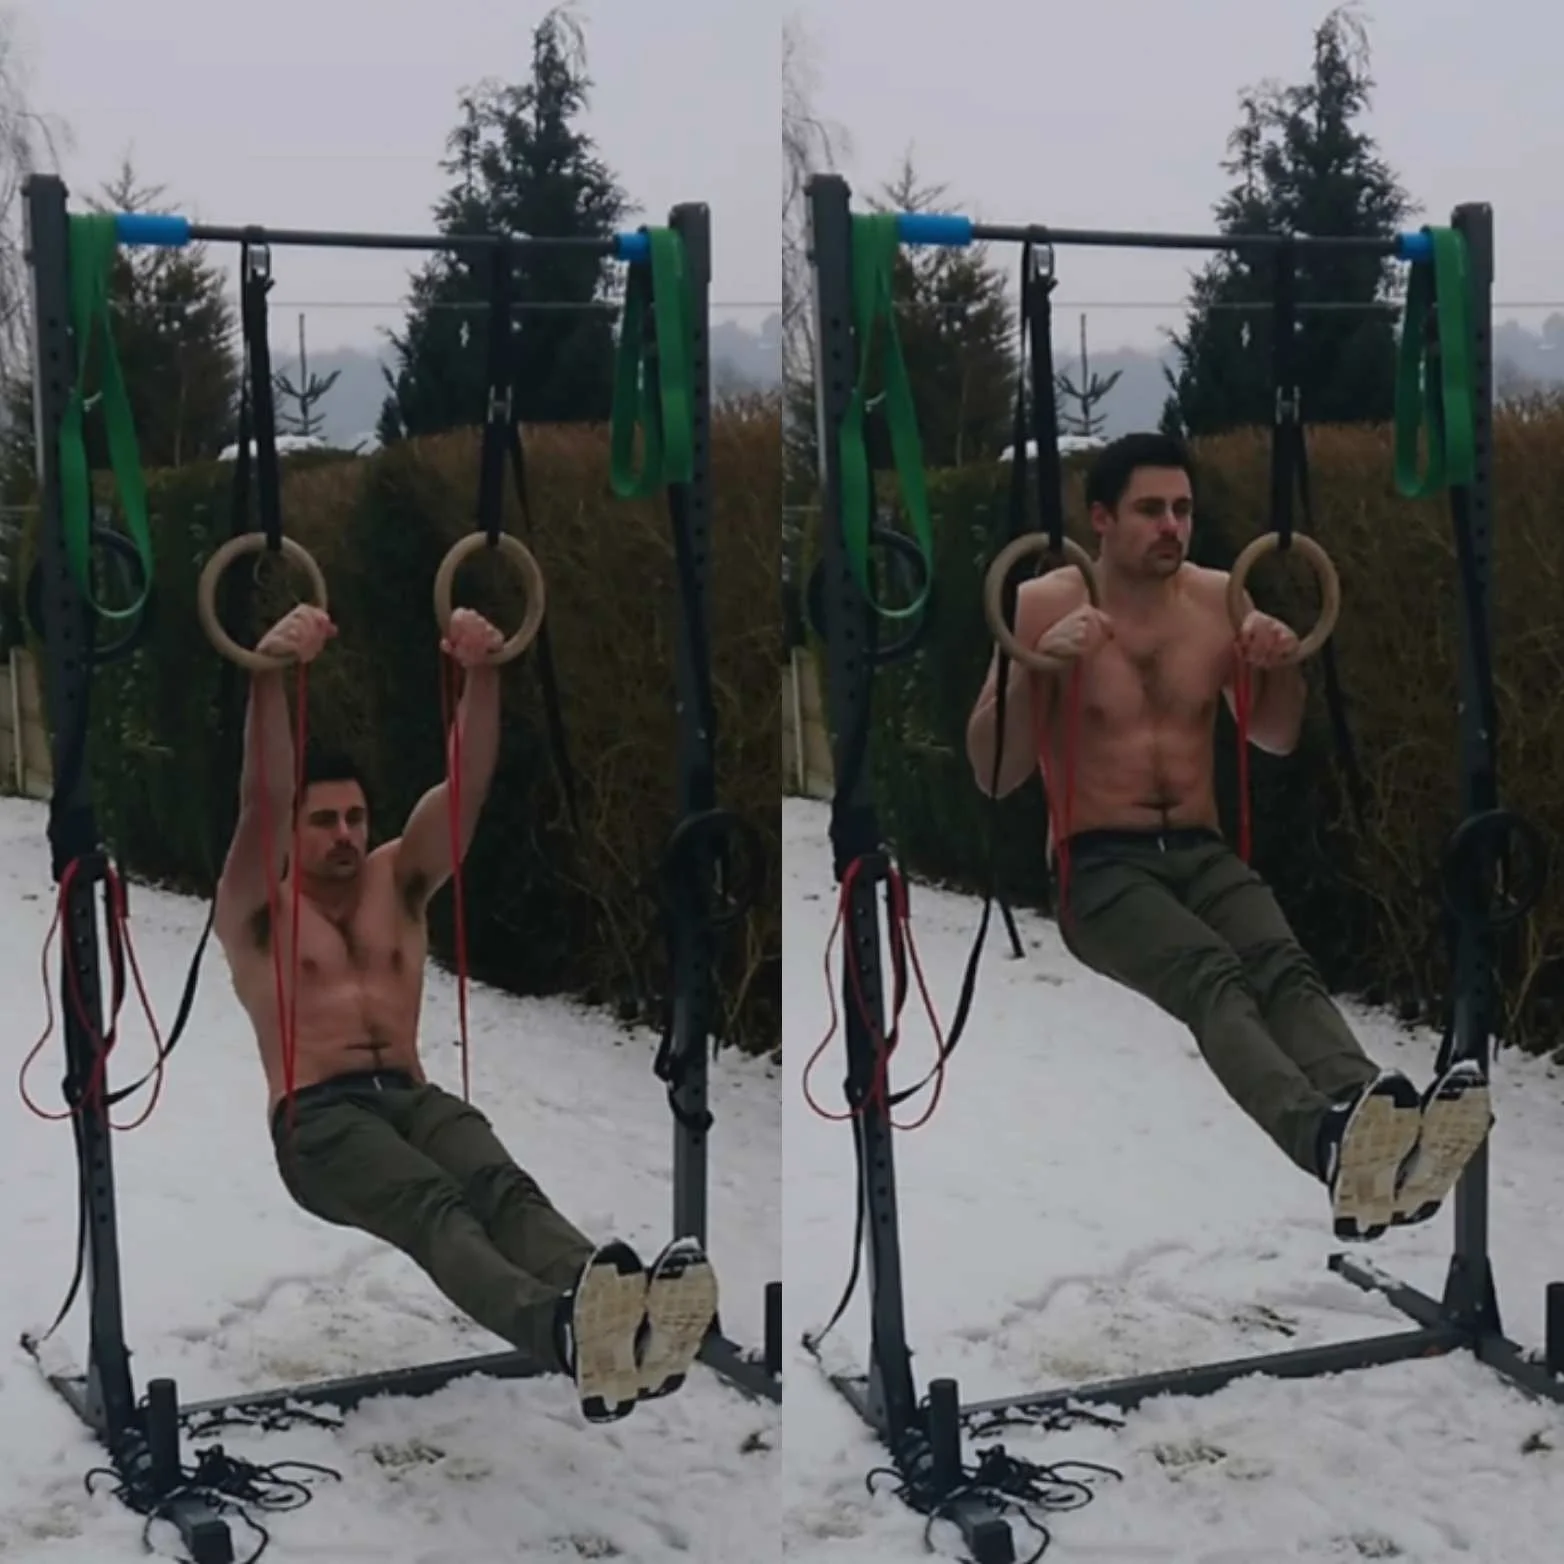
The forth progression is a static position to get you used to the feeling of holding a false grip at the bottom range of the pull up. This is the most difficult position to maintain a false grip because it requires flexibility in the wrist joint.
The false grip requires the greatest range of motion when your body is directly under the rings.
This is the portion of the false grip pull up that I struggled with most as a beginner.
Therefore for this progression I would recommend to use a resistance band like in the photo →→→
As before loop the resistance band underneath your bum and loop each end round your thumbs and adopt the false grip as normal.
If you have a range of resistance bands that are different tensions then you can progress from a thicker band for more assistance to a thinner band as you get more comfortable in this position.
This is a great way to progressively condition the false grip to tolerate this stage of the pull up.
You can also do this with your feet touching the floor to help alleviate some of your weight but I find a range of resistance bands works best as it is easier to measure your progress by advancing to using lighter bands.
It is also important to stress the use of chalk to keep your hold on the rings. You could have the strongest grip strength in the world but if either the surface of your hands or the rings are too slippy then it will be a struggle to maintain the false grip for any length of time.
The goal with this progression is to eventually hold the false grip unassisted for 10 seconds. This is the hardest part of the false grip so if you can get comfortable holding it in this position then the rest of the pull up feel much more achievable.
Again the best formula to advance from this progression is to hold the grip for as long as you can (but stop before complete fatigue) for 5 or more reps. Take plenty of rest between reps and go slowly but surely as this is more of a matter of adapting to the technique and condition the forearm then building muscle.
The false grip is a unique hold and no other discipline outside gymnastics, calisthenics or Cross Fit requires you to practice this unusual wrist position so it may take time to develop your capacity to support your body weight in this way. So be patient, take your time and use assistance where necessary.
Progression #5 The assisted false grip pull up
The fifth and final progression is the false grip pull up. The aim of the previous two progressions were to condition your tolerance of the false grip at both ends of the pull up range.
I'm sure if you are reading this you will be competent at pull ups on rings, so if you have followed the previous two progressions then this step should be very attainable.
If you can manage false grip rows for a good number of reps this will stand you in good sted to complete a full range of motion pull up.
For the first time you attempt this I would recommend trying the false grip pull up with a resistance band as in the photo.
This will alleviate some of the difficulty of the exercise and help you get accustomed to all the components of the technique:
Keeping your elbows tucked in close to your torso
Pulling the rings in more towards the chest.
The rotation of the rings from bottom of the pull to the top.
The ring pull up is inherently more difficult than a bar pull up due to the instability of the rings. However the rings do rotate freely, according to your movement, so you can adjust the angle as you move through the range of motion to the most comfortable position. This makes the technique easier on joints, ligaments and tendons.
Once you familiarised yourself with the technique and feel comfortable doing false grip pull ups with a resistance band for 6+ reps than you will be more then capable of a full unassisted pull up.
With solid training you Then you can progress to the...
The muscle up transition
Learning the false grip is essential to unlocking your first strict gymnastic rings muscle up.
The main benefit of false grip strength is that it allows you to do muscle ups slower and with greater technique without having to kip, use momentum or rely on explosive power.
A clean transition form pull up to dip on the rings would be impossible without it. The false grip versions of the ring muscle up allows you to reap the benefits of the muscle up to its full potential.
The muscle up is one of the best exercises for developing
Core strength
Shoulder stability and injury prevention
muscle coordination and proprioception (body awareness)
Compound strength exercise incorporating all the major muscle groups of the upper body
The development of upper body mobility whilst simultaneously training strength through a broad range of motion
Muscle building hitting all the main muscle groups with significant time under tension.
All the qualities contribute to the muscle ups potential for improving athletic attributes which translates well to competitive sports.
Also there is an elegance and a gracefulness to the muscle up that is lost with a lot of traditional strength and muscle building training which comes from the emphasis on the mobility of the shoulders and the upper body strength gains as you manipulate your own body weight through space whilst keeping stable.
The muscle up is a great exercise to aim for and its immensely satisfying when you achieve it. No longer is it the preserve of the light, compact gymnast but individuals like myself at 6 ft 4 and 203 pounds can reap the benefits through the right traing protocols and an understanding of how to achieve the technique.
If you would like to learn the technique of the muscle up then I would strongly recommend you check out my tutorial on the muscle up transition technique.
This tutorial details the exact steps to unlocking your first muscle up by explaining the technique of the tricky transition step by step. This is the next natural stage after mastering the false grip so check it out.
Any questions, queries or advice on the false grip and its application to the muscle up, please comment down below and if you found this helpful share on the usual social media channels. Good luck!

